

Hackintosh
by Thü Hürlimann, September 2013
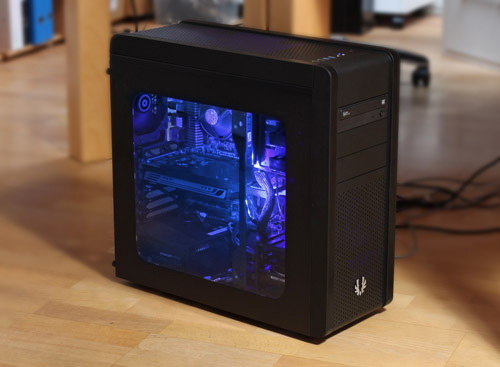
A Hackintosh running Mac OS X 10.6 Snow Leopard A computer with components not assembled and sold to you by Apple but running/working under Mac OS X is called a Hackintosh. The reason to create a Hackintosh for me was my need to use certain software which does not work on actual Mac OS X Lion (or later) anymore. PPC software like FreeHand needs Rosetta to be able to run on Intel Macs, and Rosetta is not included and does not run in OS 10.7 or later anymore. In this article I will explain reasons for a 10.6. Hackintosh and get you through the building process step by step.
My Hackintosh logo, usage at your discretion.
An other reason to stay on 10.6.8 Apple is heading into the wrong direction. In fact, Apple started disappointing me already in 2008, like I stated here a year ago. If you followed the development of Apples Mac OS, you probably know, the general GUI guideline was way more strict and logic within the Classic OS up to 9.x.
We got a huge technical advance with the step over to Unix based OS X, but lost much of its logical and consistant approach to GUI. During the following versions, OS X got slightly better from that viewpoint and even adapted partially an open philosophy with the Darwin open source Mach/Unix core. But when Apple had its big commercial success with the iPhone, it started to go over to the dark side. Suddenly new versions of software like QuickTime X, iMovie 9, Final Cut Pro X, were developed who are inferior to their predecessors and together with iPhoto, iTunes and other applications, began a strategy of "the user has not to care where his files are stored" - we know from mobile systems like iOS.
Apples software gets more and more diverted from the GUI guideline which before made sure similar functions work the same in all applications. Compatibility in file exchange got restricted (like export for iPhone or iTunes only instead of options like a flexible QuickTime export etc.) iTunes, Appstore and Apples online services are a typical example of how you can not even expect the most basic functions anymore. You can't get an old version from an app in the Appstore if you need it. You only get the newest one. Search for something compatible with your older device is not possible. Same like searching something in Apples Forum or on iTunes, it always includes all categories; you can not search for "Adam" only within classical music. It feels like the stone age of computing again.
Mac OS X becomes more and more like iOS; closed down, only apps from the Appstore allowed, your every move under surveillance. So, thats where Apple is heading. Thats why I recommend to everyone: go over to Linux while you still can.
Unfortunately for us designers, thats very difficult as we don't have really well working prepress software for Linux available (Gimp has no CMYK working mode, for example). And even when, our workflow includes the ability to exchange Indesign documents with customers and partners. Designers depend too much on Adobe, thats true. But if we can not go over to Linux, at least we can avoid getting taken by Adobes cloud services.
So, the other thing I recommend designers: Stay with your version of the Creative Suite. In my case it is CS4. I bought CS5 but found its new non-optional "features" disturbing, so I stay with CS4. Do new versions really bring something necessary for you? I have done in 1995 about the same designs I do today. Okay, it got a bit easier, but thats all. And technical development for prepress has reached its top around about 10 years ago. The only thing we really need is file backwards-compatibility and Adobe has made sure each version has its limits on that anyway, so force you to buy the newest version, nevertheless it has nothing new you really need.
Again, there are many reasons to get a Hackintosh and stay with all the software you are using right now: Adobe and Apple are heading into the wrong direction and both want to take total control over you. And anyway, you want to continue using your PPC software (like FreeHand in my case).
The downside
On a Hackintosh, you can not easily install system updates, make a restart and just be up and running. It may work. But you have to consider that it does not and that you have to spend some time getting it to work again. On the other hand, if you decided for Snow Leopard and want to stay with it, once you are on 10.6.8, there comes nothing new and you don't have to worry about that. If you have issues with your machine, you will have to find the solution for yourself, consult forums and try options, maybe even buy alternative hardware and go step by step with the trial and error method. Furthermore: Sleep mode may not work, depending on your hardware. And as of yet I could not get USB 3.0 to work with Snow leopard.
[update] I had some crashes during the first couple weeks until I found out I used the wrong Ethernet driver. It is now 5 months after that and I did not get one single problem or crash during all that time. I made a second Hackintosh for a friend and it runs stable as a rock too.
Time needed
You have to count 2 quiet days to assemble your machine and get it up and running. With some luck, all your parts work well together and you reach your goal within 2 – 4 hours, but you never know.
Productlist
 | CPU: i7-2700 3500Hz Quad Core |
 | Motherboard: Gigabyte Z68X-UD5-B3 |
 | Graphics Card: Sapphire Radeon HD 5770 |
 | System volume: 480GB PNY Flash XLR8 Pro SATA SSD |
 | RAM: Kingston 1333MHz DDR3 2x8GB ECC PC3-10666 |
 | DVD-drive: Samsung SH-224DB/BEBE |
 | Case: Bitfenix Ronin (with window) |
 | Power supply: Be-quiet Straight Power E9 600 Watt |
 | Original Apple install DVD for Snow Leopard 10.6 |
 | Apple USB mouse and keyboard |
Sources for information
You may find other hardware that works. These Hackintosh dedicated websites have lists of CPU's, motherboards and other stuff that can be used:Tonymac: Snow Leopard Sandy Bridge builds
Hackintosh
Tonymac
Lifehacker
but it has become difficult to find informations regarding Snow Leopard compatible hardware even here, because most Hackintoshs now run Lion or newer OS. Thats why I decided to make this page and ask those of you who also made a 10.6 Hackintosh to , so I can include that at the end of this article as a help to others.
Warning
Always have a backup of your data. Always follow the instructions delivered with the products first, because this guide is specific to my hardware and circumstances and may not be correct for yours. I can not be hold responsible for damages or loss of data your setting may cause.
The fundamental hardware that has to be working well together:
CPU: The Intel i7-2xxx (Sandy Bridge) CPU's are the latest supported by 10.6.8. There are higher speed CPUs available, but they will not work with Snow Leopard (except*). The i7-2700K 8 core may be the ultimate thats working well with Snow Leopard. There are experimental installs running 10.6 on Ivy Bridge, see infos about that at Macbreaker. *Basically, if you want a newer CPU based on Ivy Bridge, but running with 10.6.8, you would have to replace the Snow Leopard Kernel with the Kernel of Lion or later OS. AMD processors can not be used.
Motherboard: Gigabyte motherboards are the ones best documented. Basically, look first on Tonymac if a DSDT (a prearranged set of drivers) is available for that motherboard. There are other installing methods like myHack, if you prefer that, check which hardware works with this. (See "Infos about installing methods") Then make sure it has the right socket and chipset for your processor and is the right size with your case (usually ATX). The i7-2700 needs a LGA1155 socket and one of the following chipset: H61, P67, H67, Z68 (Q67, Q65, B65 could work too, but they have no DSDT available on Tonymac). In 2013 it is already not that easy to get a suitable mobo you have to looke out for used ones. Search for GA-Z68X or GA-Z68XP, those are the latest.
Graphics Card: Making sure to have as less problems as possible, I first decided for Apples version of the ATI Radeon 5770 graphics card, supported by 10.6.4 or newer. That one has a DVI and two Mini-Display ports, unlike other versions from AMD or Saphire. A problem with Apples card may be that it is very long. I later prefered the Sapphire Radeon 5770 HD, it has DVI and HDMI but no Mini-Display ports, is shorter and produces less fan noise. The Radeon 6870 is also often used, but has up to 40% more power consumption. You probably do not need a very powerful card if you mostly do prepress and design work. The i7-2700 has its own internal graphics processor (HD Graphics 3000), but the use of it is supported only from OS X 10.7 on upwards. So yes, you do need a graphics card for Snow Leopard.
RAM: The i7-2700 needs DDR3-1066/1333 RAM, maximum is 32GB.
Storage: Sata HDD or SSD. The startup volume must be 1TB or less (or else the Chameleon boot loader can not start from it).
Power supply: 600 Watt seems very much. But it will only draw what is needed, usually around 100 Watt, You have to make sure it can never get overloaded even if everything is running on max. So just to be sure, use at least a 500 Watt or stronger unit.
Case: It has to be big enough for your mobo and graphics card. I have always used ATX size mobos and cases nevertheless I do not really need that much space for additional data storage. My first build was a Silverstone SST-FT02B case, but it was way too big, too noisy and has cable connections on top which really was of no use to me, but rather annoying. So I changed to a Bitfenix Ronan with a side window and did some LED pimping and I am really happy with it.
Other things:
Bluetooth: There are PCI cards available but it seems many of them are making problems. It is much more easy to just use an USB Bluetooth Adapter. I got a D-Link DBT-120 and a Delock 61772 who both worked instantly by just plugging it in. My first try was a Trust 4.0 which was not recognized by OS X 10.6.8. However, after having the D-Link or the Delock connected directly at the PC case and working with the mouse, mouse movement was not always smooth. I got better results connecting it closer to the mouse at the keyboard or an USB router on my desk.

Motherboard on the table. Protect electronic contacts from static.

The i7-2700 placed and secured in its socket on the motherboard.

Power supply installed in case

Fan placed on CPU and 2x8GB Ram installed using one channel.

Sapphire Radeon 5770 Graphics Card installed in PCIEx16 slot. Note the PCI-E VGA cable connected (at right) coming from the powersupply.

All hardware installed and ready.
1. Start by placing your motherboard (or mobo as we call it from now on) on its static-free bag on your table. Make sure you wear antistatic protection or (like I did) be careful not to touch any electronic contacts.
2. On the mobo open the CPU socket protection. There is a plastic part you may store for later usage (in case you want to sell the mobo). Be careful with the metal climb handle, it has quiet some tension on it. Beware not getting any dust on the socket.
3. Take the i7 CPU and place it on the socket. Align it with the socket cutouts. Follow the instructions delivered with the processor.
4. Putting the metal handle back, again needs quiet some tension/force.
5. Prepare your PC case by first installing the power supply. The fan goes to the outside of the case.
6. Now install the mobo inside the case. The mobo comes with a cable connector cover for all the USB and other ports. Place that on the case first. (Mine did not fit at all, so I left the case without it). Then, usually you have to put in the board distance holder screws first (between case and board), depending on the size of your motherboard.
7. Place the fan on top of the CPU. The one from the i7 comes with some thermal paste already on the fans contact plate. Just place it there and put in the pins like described in the i7 instructions.
8. Install the RAM on the mobo. Hackintosh guides recommend installing only 4GB first, but I had 2x8GB, so I placed 8GB without problem (adding the other 8GB after OS X was installed and the Hackintosh configured properly). Gigabyte mobos have 2 channel RAM slots, one channel 2x white, one channel 2x blue. If you use only two slots of them, use the white ones.
9. Connecting fans. Your CPU fan first. Then you will have some fans from the case. The SST case alone has 4 fans (not counting the one of the power supply) and the mobo has not so many fan connectors. But with the SST comes an adapter to use a power connection directly from the power supply.
10. Connect the power to the mobo. There is a 24 pin connector and an 8 pin connector. The 8 pin may be made out of 2x4 pin. They/it should be formed so they can be put into the socket only in one way.
11. Connecting case cables for startup button, USB, Audio and lights etc. depending on your case. See your case and mobo installation instruction.
12. Installing and connecting SSD or HD. For now, do connect your startup drive only. Connect the power cable from the power supply and a Sata cable (delivered with the mobo). Connect it at Sata port 0.
13. Installing and connecting a CD/DVD drive. Connect power and any Sata port higher number than the start drive.
14. Install your graphics card. You use the fastest PCI-E slot for this. On my mobo it is the one PCIEx16. The Radeon 5770 fits just into this case – I had to force it somehow over one of the three big fan. Now for me the surprising part was that such cards additionally get connected by cable directly to the power supply too!
15. Connect a mouse and a keyboard on USB ports and connect the power cable to the power supply.
Your hardware is ready.
Infos about installing methods
Below I am using the Multibeast DSDT method as found at Tonymac. There are other methods available like Kakewalk, myHack or Unibeast (for informations about the differences of these methods see this article from Macbreaker). Unfortunately Unibeast and Kakewalk (the most easy solution it seems) are not working for Snow Leopard. They start on basis of an OS downloaded from Apples Appstore. So the only alternative you may consider is myHack (make sure you use the original from myhack.sojugarden.com). It works for Snow Leopard too and should be more easy to install than my approach with Multibeast. Make sure you have the hardware that works for the myHack method.
You may simultaneously follow the guide at Tonymac
Preparation:
- On your PC have only one Sata hard drive (at Sata 0) and one PCIE graphics card installed.
- No USB devices except your keyboard and mouse connected.
- Download iBoot from Tonymac (You need to register there first). Burn a CD with only iBoot on it (usually iBoot, not iBoot Legacy, except your CPU is not supported in iBoot).
- Download Multibeast for Snow Leopard and DSDT for your mobo from Tonymac. Also Download UpdateHelper. Regarding DSDT, you need to know the actual BIOS version of your motherboard (F7, F8 etc.), in other words: You need to get into the BIOS and look it up there (press F9 key). Put Multibeast, UpdateHelper and DSDT on a USB stick
- Have your original Mac OS X 10.6 installation DVD handy
- Download the 10.6.8 combo update and copy it to the USB stick too
First Part: Adjusting BIOS
1. Put the button for the power supply in ON position
2. Press the startup button on your PC case
3. Instantly press and hold the "delete" key on your keyboard ![]() (the real delete key, not "backspace") while some diagnostics is processed and shown on display – probably after you see Gigabytes ugly splashscreen. Now this can take some minutes, you only see a white underline on top left of the black display. If you see instead a message "Loading Operating System…", it means the "delete" key has not worked for your setting. Try F2 or F12, this may depend on the version of BIOS your motherboard uses.
(the real delete key, not "backspace") while some diagnostics is processed and shown on display – probably after you see Gigabytes ugly splashscreen. Now this can take some minutes, you only see a white underline on top left of the black display. If you see instead a message "Loading Operating System…", it means the "delete" key has not worked for your setting. Try F2 or F12, this may depend on the version of BIOS your motherboard uses.
4. Set the following BIOS options:
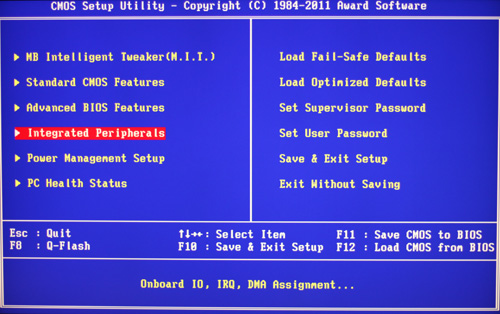
First from the right column load "optimized defaults". Then hit F10, "Y" and "return". The PC restarts. Hold the "Delete" key to return to the BIOS.
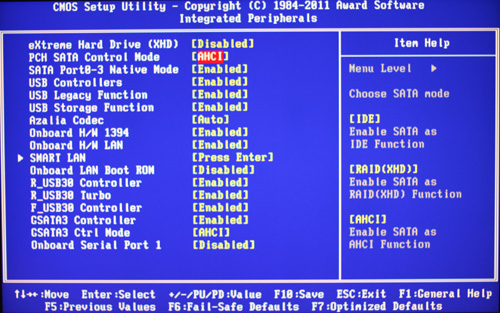
Go into "Integrated Peripherals". Set eSATA3 (or gSATA3) and PCH SATA control mode to ACHI. Hit "esc" to go back to the main menu.
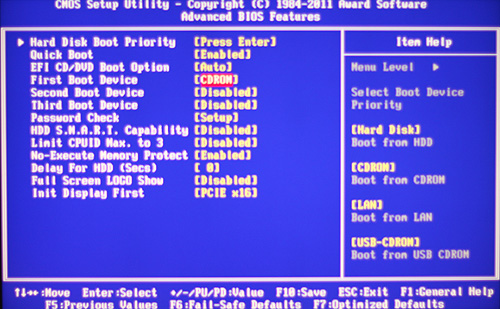
In "Advanced BIOS Features" choose CDROM as your first boot device and the PCI port of your graphics card at "Init Display First" (probably PCIE x16).
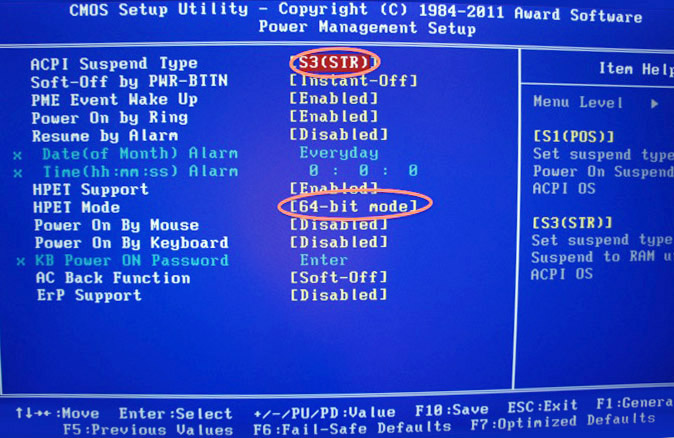
In "Power Management" leave ACPI suspend type at S3(STR) and set HPet mode to 64bit.
5. Put the CD-ROM containing iBoot into your drive.
6. "esc" back to the BIOS main menu and hit F10 for saving the changes. Confirm with "Y" and "return". Your PC shuts down and after some seconds, starts up again.
Second Part: Installing Mac OS X
1. If it does not already, start your Hackintosh. The iBoot CD must be in the CD/DVD drive.
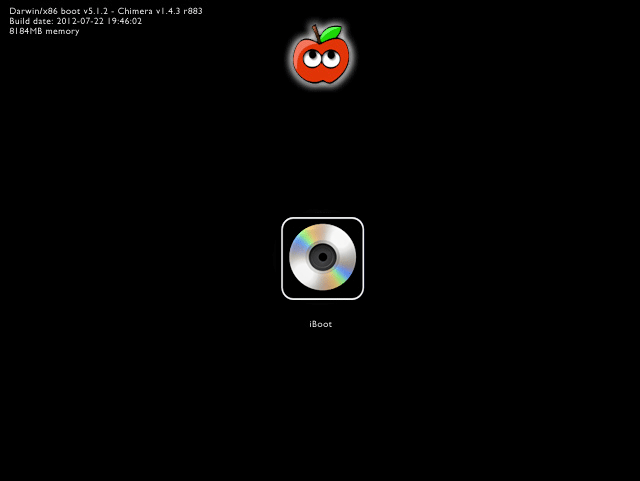
2. Right after this iBoot screen comes up, take out the iBoot CD and put the 10.6 Snow Leopard install disk in.
3. Wait some seconds, then hit F5 on your keyboard and the install disc should appear on the screen.
4. Press the return/enter key. This should bring you to step 6.
5. If you can not get to the OS X Installer, consult the "Problems?" section below.
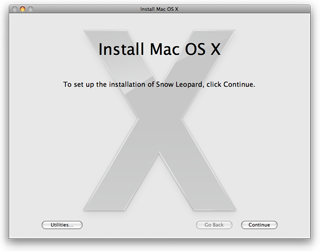
6. Install CD begins loading and the OS X install screen appears.
7. Install dialogue, before choosing where to install, go to menu and open the disk utility.
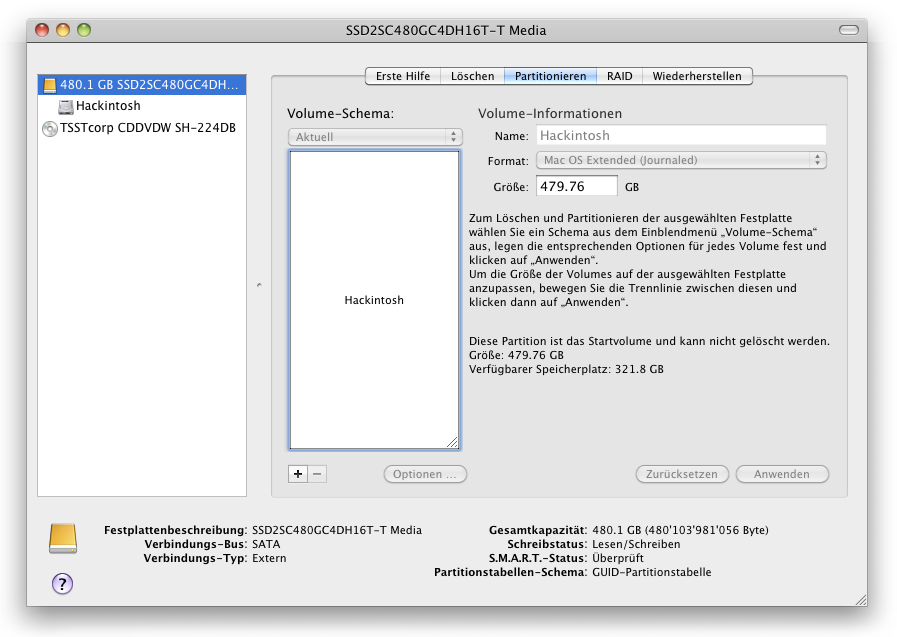
8. In Disk Utility choose your startvolume, make one partition on that drive, Mac OS Extended (Journaled). The maximum partition size must be 1TB, or the Chameleon bootloader will not work. Also important is that, under "options", you set the partition scheme to GUID. Apply your changes and close Disk Utility.
9. Choose the install volume and start the installation process.
10. Follow the process. In my case after 50% of the time, I suddenly got a black screen. I tried it three times and it always happened. Other Hackintoshers reported an install error message at some point. However, I found out that the installation was completed but could not make the closing statement properly for some reason.
11. Reboot with the iBoot CD loaded. (At this point it is important to know that with the Sandy-Bridge CPU, you have to startup always from iBoot until you made the update to 10.6.8 which then supports Sandy Bridge).
12. At the iBoot screen next to the iBoot disk icon, you should now see your startvolume. Choose it with the arrow key and hit return/enter. (If you needed a boot-flag before in step 5, use it again now).
13. Hopefully, your System starts loading. Eventually you get to see the OS X welcome video (well, I did not). And you get to setup your user account and get to your Finder desktop. I had a problem with my graphics card at this point, getting black screen. See at the bottom in "Problems?" about the solution.
14. Copy Multibeast, the 10.6.8 combo update, UpdateHelper and DSDT (the one for your mobo you downloaded from Tonymac) from your USB stick onto the desktop.
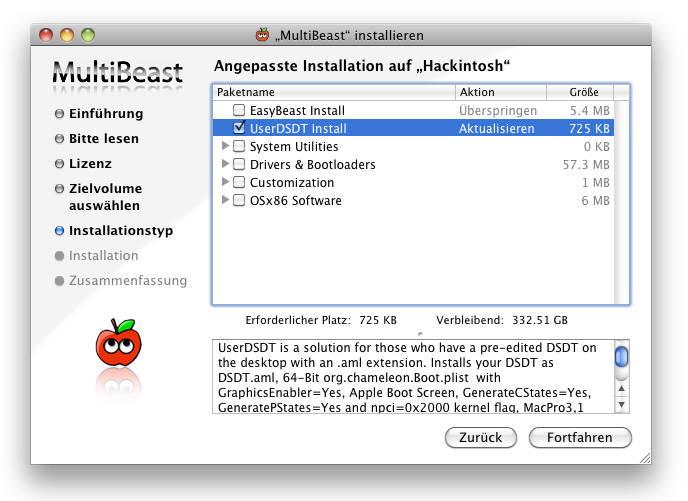
15. Now open Multibeast, choose DSDT and install your DSDT. After the installation completed, start Multibeast again, select "System Utilities" and install (this may need some minutes, adjusting permissions)
16. Run UpdateHelper and reboot after it completes. Start up again using the iBoot CD.
17. Now install the 10.6.8 combo update. But do not restart after the installation finished! Start Multibeast again, select "System Utilities" and install again (adjusting permissions).
18. Now remove the iBoot CD and restart your computer holding the "delete" key. Going into BIOS "Advanced Settings", set the boot order to HD, CD Rom, USB. F10 save the settings and restart the computer.
19. Your machine should startup and go into the Chameleon boot load screen (which looks similar to the iBoot screen). It holds here for some seconds, in case you need to set a flag (see "Problems?") while a process bar counts down some time. After that, it should load just fine into OS X. Remember, if the Radeon 5770 shuts down, again disconnect DVI cable and put it back on and you should get to your Finder desktop.
20. If everything works fine, you may now install the rest of your RAM and restart again. If this works fine, install other HDD if you need. Make sure to have your startvolume at Sata 0 and have your BIOS set to HDD as your first boot volume.
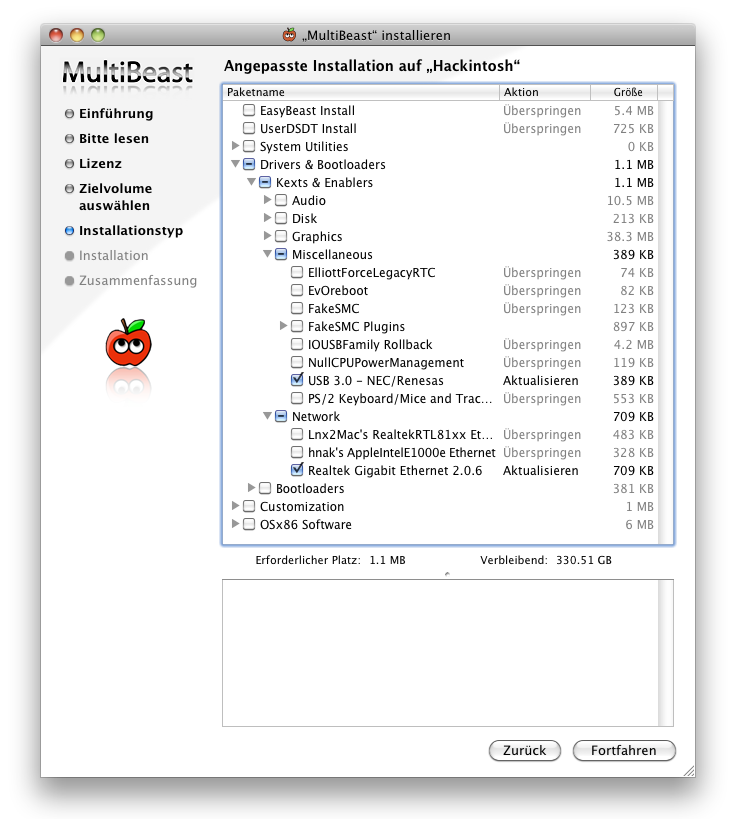
21. Now run Multibeast to install further drivers you require for Ethernet, USB 3.0, Audio output, etc. You have to consult the manual of your mobo and see which chipset has been used for each of them. In Multibeast check the information of each driver option, it tells you which chipset it is intended for. In order to avoid sudden problems, best practice is installing one driver, run System Utilities, make a restart of your PC to check if it works, then go on do the same with the next driver. Of course you can install all necessary drivers at once, run System Utilities once and restart once, but if suddenly the system does not boot up, crashes or has other problems, you will need a lot of time identifying the driver that causes this.
Now, if you use a non US keyboard, you will have to seek some of the letters or symbols at the corresponding key it would be on the US keyboard. See this as a reference: ![]()
If OS X does not load after the Chameleon boot screen, you shut down your PC and repeat the startup process until you come to the Chameleon boot screen. Typing any key stops the boot process so you can set a boot flag. Probably first try just -v (at this point your keyboard still uses a US key layout, see step 5 for reference) this shows you the details of the booting process and may stop around there where a problem occurs. Try around with some of the other flags for example -x for starting in save mode or if this still does not get you to the OS X Installation screen, you can try some of the following boot-flag combinations. Always start at step 1.
GraphicsEnabler=No
PCIRootUID=1 GraphicsEnabler=No
PCIRootUID=1 -x the -x starts booting in save mode.
PCIRootUID=1 -x GraphicsEnabler=No
-v this starts booting in verbose mode, so you see whats going on.
-s
-f
npci=0x2000
More options can be found at Tonymac
In my case, to get to the Snow Leopard OS installer, I needed to type PCIRootUID=1 GraphicsEnabler=No. PCIRootUID=1 worked to get to the installer, but the graphics card shut down. GraphicsEnabler=No prevented the shutdown. Both together got me to the installer. If none of them brings you to the Finder desktop, you may need to start up again using the iBoot CD-ROM. Important is, you get to the desktop so you can use Multibeast to install any necessary drivers or just run System Utilities again. If nothing brings you back to the Finder desktop you could remove the startup volume and mount it on an other Mac to run Multibeast or KextBeast there. The only other solution would be to start from scratch and install OS X again.
Important to know: If your machine hangs at start looking for an operating system and can not even get to iBoot or Chameleon screen, you probably should change the order of your SATA drives. Make your start volume the first one (on the Gigabyte mobo first SATA is on the right side). Or disconnect everything but the start drive. Anyway, you will finally set up your start drive in the BIOS settings. (This problem has cost me several hours of fiddling around. There was absolutely no possibility to get my machine booting, not even with iBoot in secure mode -x until I figured this out. Verbose mode -v noted [PCI configuration begin] being the moment all got stuck, so I was looking for the wrong thing, while in fact I forgot that I connected the second volume (an HDD) since the last boot - the machine later took that HDD expecting a system that wasn't there, so it got stuck.
Solving the Radeon 5770 graphics card shutdown problem
In my case with the Apple and Sapphire Radeon 5770 graphics card, soon after the Apple logo appears, the Graphics Card always shuts down and screen goes black right before showing the Finder desktop. I found out I just had to remove the DVI cable from the cards DVI bus and put it back, instantly my Finder desktop appears. This problem did not occur with smaller displays. In the end it seems, this happens because of the unusual high screen resolution I have on my NEC Multisync LCD3090WQXi display, it is 30" and has 2550x1600 pixel resolution. If you have the same problem, try this:
On your startvolume in the "Extra" folder, you find the file "org.chameleon.Boot.plist". Open it in TextEdit and add this:
<key>Graphics Mode</key>
<string>2560x1440x32</string>
(Use your monitor resolution in the string data, 32 stays for color bit-depth)
Hardware problems
USB 3.0: Multibeast has Kext files for USB 3.0 support but I could still not get USB 3.0 to work in Snow Leopard, despite the fact that the motherboard is supporting it. I can connect USB 2.0 devices at USB 3.0 ports and they do work. While my external USB 3.0 WD Passport harddisk does not show up when connected to an USB 3.0 port, the same device does mount when connected to an USB 2.0 port. Someone in a forum has claimed to be using an internal Caldigit 4-port USB 3.0 & eSATA PCIe board with Snow Leopard and said it works perfectly for him. Some Amazon comments suggest otherwise. USB 3.0 can be tricky, even with newer OS X versions. It all depends on the available drivers. Cards from LaCie, for example, have been known to only support LaCie USB 3.0 devices connected to the ports. If you have used such cards or any other USB 3.0 solution, tell me about your experiences.
Freezes and kernel panics: Your machine may work stable for weeks and then suddenly freeze or get a kernel panic. Mostly a shutdown and power off solves the problem or you have to go through the error log and see if maybe a wrong kext causes this or an incompatible driver. If not, you may need to newly set up your system. However, with a Hackintosh, it is even more important to always have an actual backup of your data at hand.
Not starting up: After finishing a hardware build, when trying to first start up, the fans began to spin for some seconds, then the whole thing shut itself down and on and down and on again every couple seconds. As I did not install internal speakers, I had no audio error signal for orientation. I took the whole mobo out, connected only the powersupply and got a clean start. Then I put things back in, one by one. The bad startup got back after putting in RAM. I tried different RAM slot configurations and found out that slot 1 and 3 were defect. That way I could not get the best possible performance because for RAM channeling slot 1 and 2 are needed. The mobo had to be exchanged.
Long waiting times on startup: My first mobo (Gigabyte P67X-UD3-B3) always needed about one minute until BIOS showed up. Also between the startup routine and the beginning of loading into Chameleon had a waiting time of about 40 seconds. I already set the first booting device for HD, did not set any other booting devices and the boot HD was at first Sata port 0. I also thought, maybe the BIOS was not installed clean, so I downloaded the last (same) version and installed it again. No change. So, obviously that mobo had some kind of a defect.
Kernel panic during Ethernet traffic: Some time after all seemed working well, I got kernel panics at least once a day. The log showed quiet some lines of errors and after some trying around, it seemed the lines "kernel extension in backtrace" and "com.apple.driver.appleRTL8169Ethernet(1.1.4a5)" were at the core of the problem. I installed the "LNX2 Realtek Primer" driver (from Multibeast) and so far I did not get those kernel panics again.
Hanging during startup: (since August 2014) Right at the moment when Chameleon Bootloader should appear, I only see an underline and a rotating slash on top left. After some time an error appears "EBIOS read error / Device timeout / Block 0x0 sector 0". I often have to startup again and mostly it does boot by then. Forums suggest this may be because of an USB device connected. Removing devices or writing "
Software problems
Some software who interferes too profound with the system can cause troubles under certain circumstances. During the first weeks with the Hackintosh, I had, about once a week, kernel panics right when the finder desktop appeared after startup. It was caused by Chronosync, a backup software from Eltima. I had it set for frequent automatic backup and to catch up the missed ones. When it starts to do the missed ones right after startup, it caused the crashes. I now have it set to not catch missed ones and the problem was solved. It still does the automatic backup just once per hour.
I only found out about the reasons for the crashes by looking into the crash log. You can find yours in "HD > Library > Logs". Look for any log file created around the time of your crash; usually the newest one.

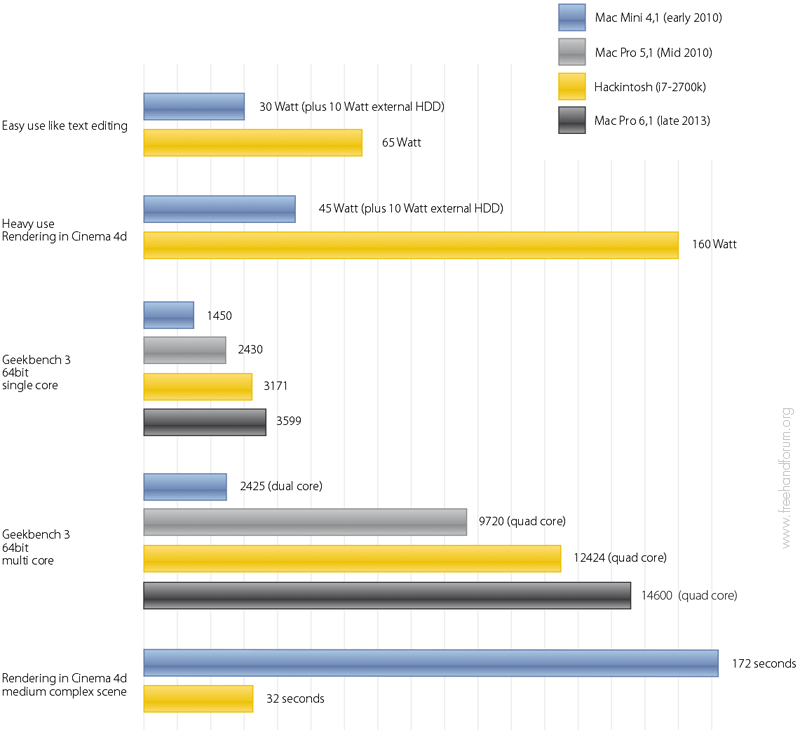
Speed and power comparison
After I got my machine working, first thing I did was install some basic software and compare the power consumption and speed to my former Mac.
The Mac Mini is a 2,4 GHz Intel Core 2 Duo (late 2010) with 8GB RAM and 250GB SSD plus 2TB HDD external running OS X 10.6.8. The Mac Pro (mid 2010) a Quad Core 3.2 GHz Intel Xeon W3565 (tested by Macworld). The Hackintosh a Quad Core i7-2700 with 16GB RAM, Radeon 5770 graphics card and 480GB SSD plus 2TB HDD internal running OS X 10.6.8. And finally the brandnew 2013 Mac Pro 6,1 (aka "Trash-Can") 8 core 3.0 GHz running OS X 10.9 Mavericks (tested by Macworld). Note: Of course Geekbench is not a fair basis for the new Mac Pro, as its strength lies more in 4K video production.
Now its your turn. If you made your own Hackintosh and run 10.5 or 10.6 (or lets say any OS X before Lion 10.7), probably to continue using FreeHand or other PPC software, so I can include your setup here as a help to others.
Thoms Top of the line pimped FreeHand Hackintosh
OS: Mac OS X 10.6.8
CPU: i7-2700 3,5 MHz Quad Core
Motherboard: Gigabyte Z68X-UD4-B3 or Z68X-UD5-B3
Graphics Card: Sapphire Radeon HD 5770 1GB
System volume: 480GB PNY Flash XLR8 Pro SATA SSD
RAM: Kingston 1333MHz DDR3 2x8GB ECC PC3-10666
CD/DVD drive: Samsung SH-224DB/BEBE
Case: Bitfenix Ronin (with side window)
Case internal LED: BitFenix Alchemy Connect 6x LED-Strip blue
Power supply: Be-quiet Straight Power E9 600Watt
Bluetooth: Delock 61772 or D-Link DBT-120
Beecher Wood's Micro ATX Hackintosh
OS: Mac OS X 10.6.7
CPU: Intel Core i7-870 2.93 GHz, 8 MB Cache
Motherboard: Gigabyte GA-H55M-UD2H Micro ATX
Graphics Card: Radeon HD5570
System volume: OCZ Technology 120 GB Agility 3 SSD
Second volume: Samsung 1 TB Spinpoint Hard Drive
RAM: Corsair XMS3 4 GB Dual Channel
CD/DVD drive: Sony Nec Optiarc AD-7241S-0B
Case: Chieftec BL-01B
Power supply: Antec BP550 Plus 550W ATX12V V2.2 Modular Power Supply
Thoms first build
OS: Mac OS X 10.6.8
CPU: i7-2700 3500Hz Quad Core
Motherboard: Gigabyte P67X-UD3-B3
Graphics Card: Apple ATI Radeon 5770
System volume: 480GB PNY Flash XLR8 Pro SATA SSD
RAM: Kingston 1333MHz DDR3 2x8GB ECC PC3-10666
CD/DVD drive: Samsung SH-224DB/BEBE
Case: SilverStone tower SST-FT02B
Power supply: SilverStone ST60F-ES 600 Watt
Bluetooth: Delock 61772 or D-Link DBT-120
Cheap Hackintosh
OS: Mac OS X 10.6.8
CPU: Intel Core i3-2105
Graphics Card: unknown
Motherboard: Gigabyte GA-H67M-D2
System volume: Seagate 1 TB 7200RPM
RAM: Corsair XMS3 4 GB 1333mhz DDR3 (4GB)
CD/DVD drive: Sony Optiarc
Case: Cooler Master Elite 341
Power supply: Corsair CX430
Medium Hackintosh
OS: Mac OS X 10.6.8
CPU: Intel Core i5-2400
Motherboard: Gigabyte GA-H67MA-UD2H-B3
Graphics Card: AMD Radeon HD 5770
System volume: Seagate 1 TB 7200RPM
RAM: Corsair XMS3 4 GB 1333mhz DDR3 (4GB)
CD/DVD drive: Sony Optiarc
Case: Cooler Master Elite 341
Power supply: OCZ 500 watt ModXStream Pro
Medium Hackintosh 2
OS: Mac OS X 10.6.8
CPU: Intel Core i5-2500K
Motherboard: Gigabyte GA-Z68MX-UD2H-B3
Graphics Card: AMD Radeon HD 6850
System volume: Seagate 1 TB 7200RPM
RAM: Corsair Vengence Blu 1600Mhz DDR3 (8GB)
CD/DVD drive: Sony Optiarc
Case: Cooler Master Elite 341
Power supply: OCZ 500 watt ModXStream Pro
Pro Hackintosh
OS: Mac OS X 10.6.8
CPU: Intel Core i7-2600K
Motherboard: Gigabyte GA-Z68X-UD5-B3
Graphics Card: AMD Radeon HD 6870
System volume: Seagate 1 TB 7200RPM
RAM: Corsair Vengence Blu 1600Mhz DDR3 (16GB)
CD/DVD drive: Sony Optiarc
Case: Cooler Master Elite 370
Power supply: OCZ 600watt ModXStream Pro